
2つのswiperを連動、かつアイテムを動的に設定したので実際のコードを記載していきます。
なお、カスタム投稿は既に作ってあるという前提で進めます
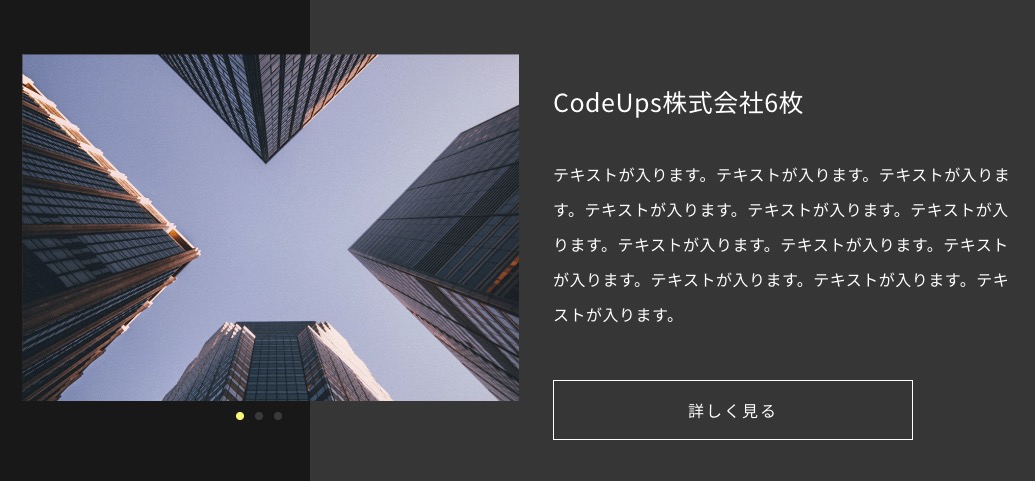
以下の動画のようなイメージです
左側の画像と右側のテキストエリアが連動してオートスライドし、左側の画像をドラッグしても右側のテキストエリアも連動するイメージです!
最初は連動ではなくひとまとめにしていましたが、それだとページネーションの位置取りが難しいので(というか無理だった)、2つを連動させてページネーションは画像の下に配置することにしました
※スタイルについては省略します
コード
オプションページの作成
スライダーアイテムを動的にするためにオプションページを作成します
//TOP - 制作実績表示設定
/**
 * @param string $page_title ページのtitle属性値 (必須)
 * @param string $menu_title 管理画面のメニューに表示するタイトル (必須)
 * @param string $capability メニューを操作できる権限 (必須)
 * @param string $menu_slug オプションページのスラッグ (必須)
 * @param string|null $icon_url メニューに表示するアイコンの URL
 * @param int $position メニューの位置
 */
SCF::add_options_page( 'トップ制作実績', 'トップ制作実績', 'edit_posts', 'top_products' , 'dashicons-admin-generic' , 11);
/**
 * カスタムフィールドを定義
 *
 * @param array  $settings  MW_WP_Form_Setting オブジェクトの配列
 * @param string $type      投稿タイプ or ロール
 * @param int    $id        投稿ID or ユーザーID
 * @param string $meta_type post | user
 * @return array
 *
 */
function my_add_meta_products($settings, $type, $id, $meta_type)
{
  if ('top_products' == $type) {
    $setting = SCF::add_setting('id-mv_slider', 'トップ制作実績設定');
    $items = array(
      array(
        'type'        => 'relation', //*タイプ
        'name'        => 'top_products_relation', //*名前
        'label'       => '関連する制作実績', //ラベル
        'post-type'   => array( 'products'), //投稿タイプ
        'limit'       => 1, // 選択できる個数
        'instruction' => '制作実績を1つ選んでください', //説明文
			),
      array(
        'type'        => 'textarea', // タイプ
        'name'        => 'top_products_subtitle', // 名前
        'label'       => '制作実績サブタイトル設定', // ラベル
        'rows'        => 3, // 行数
      ),
    );
    $setting->add_group('top_products_group', true, $items);
    $settings[] = $setting;
  }
  return $settings;
}
add_filter('smart-cf-register-fields', 'my_add_meta_products', 10, 4);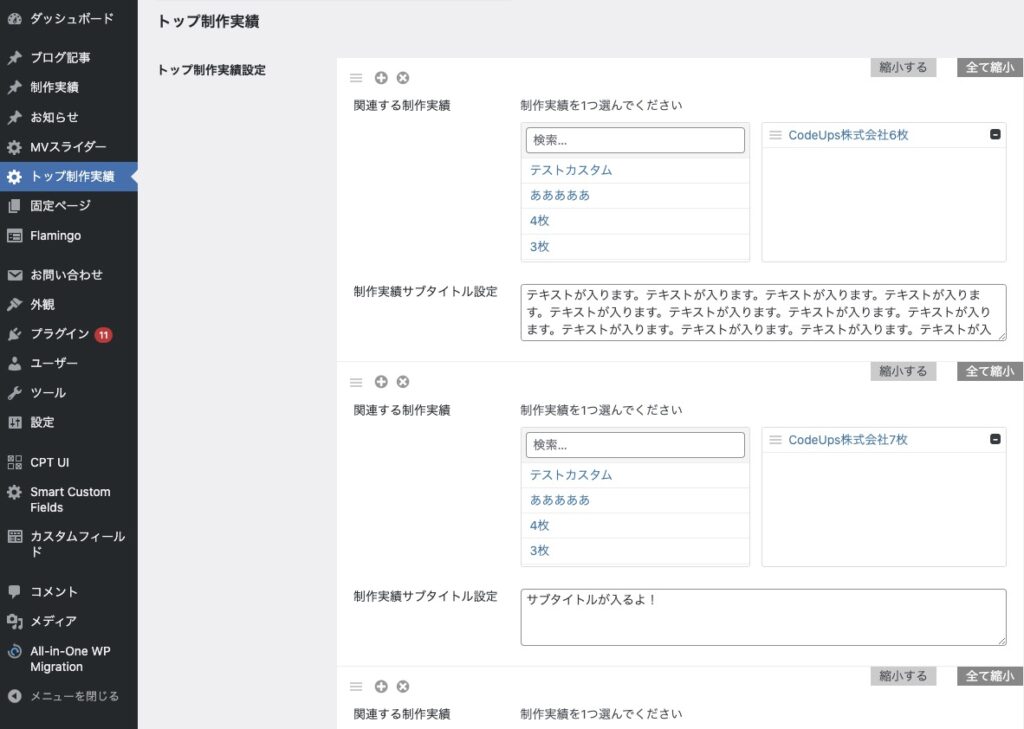
こちらの作成方法は以下のいちくんさんのものをベースにしています

PHP
PHPの中身です
<!-- スライダー テスト -->
<?php
$top_products = SCF::get_option_meta('top_products');
$top_products_group = $top_products['top_products_group'];
if (!empty($top_products_group)) :
?>
<div class="p-top-works__content p-top-contentBox">
<!-- 制作実績スライダーアイテム -->
  <div class="p-top-contentBox__wrapper">
    <div class="p-top-contentBox__items-wrap">
      <div class="swiper js-top-works-slider01 p-top-contentBox__items">
        <div class="swiper-wrapper p-top-contentBox__item">
          <?php
          //SCFで設定した制作実績を1つづつ取り出す
          foreach ($top_products_group as $item) :
          //選択した関連する投稿「products」
          $top_products_relation = $item['top_products_relation'];
          //選択した関連する投稿「products」の投稿ID
          $products_id = $top_products_relation[0];
          ?>
          <div class="swiper-slide p-top-works__image p-top-contentBox__image">
            <!-- アイキャッチが設定されていない場合は画像グループ内の画像1枚目 -->
            <?php
            // 選択した関連する投稿のアイキャッチ画像URLを取得
            $thumbUrl = get_the_post_thumbnail_url($products_id, 'full');
            //それぞれの投稿IDに紐づいた画像グループを取得
            $galleryImgGroup = SCF::get('galleryImgGroup', $products_id);
            //画像グループ内の画像を取得して1つづつ取り出す
            foreach( $galleryImgGroup as $field ) :
              $ImgUrl = wp_get_attachment_image_src( $field['gallery_img'], 'large' ); //画像URL
              $ImgAlt = $field['gallery_imgAlt']; //alt
            ?>
            <img src="<?php if($thumbUrl){ echo esc_url($thumbUrl); } else {echo esc_url($ImgUrl[0]);} ?>" alt="<?php if($ImgAlt){echo $ImgAlt;} else {echo '制作実績イメージ';} ?>">
            <?php break; endforeach; //break;で1回だけ回す ?>
          </div>
          <?php endforeach; ?>
        </div>
      </div>
      <div class="swiper-pagination js-pagi01 p-top-contentBox__pagination"></div>
    </div>

    <div class="swiper js-top-works-slider02 p-top-works__box p-top-contentBox__swiper02">
      <div class="swiper-wrapper">
        <?php
        //SCFで設定した制作実績を1つづつ取り出す
        foreach ($top_products_group as $item) :
        //選択した関連する投稿「products」
        $top_products_relation = $item['top_products_relation'];
        //選択した関連する投稿「products」の投稿ID
        $products_id = $top_products_relation[0];
        //サブタイトル
        $top_products_subtitle = $item['top_products_subtitle'];
        ?>
        <div class="swiper-slide p-top-contentBox__swiper02-slide">
          <p class="p-top-works__title p-top-contentBox__title"><?php echo get_the_title($products_id); //投稿IDに紐づいたタイトル ?></p>
          <p class="p-top-works__body p-top-contentBox__body"><?php echo nl2br($top_products_subtitle); //SCFで設定したサブタイトル ?></p>
          <div class="p-top-works__btn p-top-contentBox__btn">
            <a class="c-btn" href="<?php echo get_permalink($products_id); //投稿のURL ?>">詳しく見る</a>
          </div>
        </div>
        <?php endforeach; ?>
      </div>
    </div>
  </div>
</div>
<?php endif; ?>オプションページを1つずつ取り出して、オプションページ作成時にnameで設定したものを$top_products_relation = $item['top_products_relation'];のように変数に入れていきます
何の情報を取りたいかはその時々で変わると思うので、適宜var_dump();で確認してください!
<?php

//中略

//選択した関連する投稿「products」の投稿ID
$products_id = $top_products_relation[0];

//中略

?>
<div class="swiper-slide p-top-works__image p-top-contentBox__image">
  <!-- アイキャッチが設定されていない場合は画像グループ内の画像1枚目 -->
  <?php
  // 選択した関連する投稿のアイキャッチ画像URLを取得
  $thumbUrl = get_the_post_thumbnail_url($products_id, 'full');
  //それぞれの投稿IDに紐づいた画像グループを取得
  $galleryImgGroup = SCF::get('galleryImgGroup', $products_id);
  //画像グループ内の画像を取得して1つづつ取り出す
  foreach( $galleryImgGroup as $field ) :
    $ImgUrl = wp_get_attachment_image_src( $field['gallery_img'], 'large' ); //画像URL
    $ImgAlt = $field['gallery_imgAlt']; //alt
  ?>
  <img src="<?php if($thumbUrl){ echo esc_url($thumbUrl); } else {echo esc_url($ImgUrl[0]);} ?>" alt="<?php if($ImgAlt){echo $ImgAlt;} else {echo '制作実績イメージ';} ?>">
  <?php break; endforeach; //break;で1回だけ回す ?>
</div>
<?php endforeach; ?>
ここの部分はカスタム投稿で設定したギャラリー(画像グループ)の情報を取ってきて、サムネイル画像を表示、サムネイルがなければギャラリーの1番目の画像を表示するようにしています。
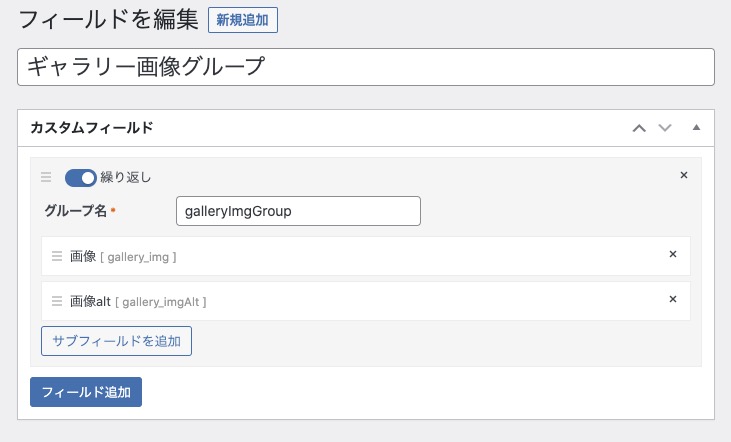
$galleryImgGroup = SCF::get('galleryImgGroup', $products_id);
ここでは「関連する制作実績」で選んだアイテムのIDをもとにギャラリー画像の情報を取得し、あとはforeachで回して画像URLを取得しています
画像ギャラリーは複数枚画像が入っていますが、必要な画像は1枚目だけなのでbreak;でループを1回だけ回します
タイトルはget_the_title($products_id);で、ボタンのリンクに関しては、get_permalink($products_id);でパーマリンクも取得できますね!
jQuery(JS)
swiperに関する記述です
swiperWorks02がテキストエリアのswiper、swiperWorks01は画像エリアのswiperです
/* トップWorksスライダー設定 テスト02 */
const swiperWorks02 = new Swiper ('.js-top-works-slider02', {
  slidesPerView: 1,
  loop: true,
  allowTouchMove: false,
});

/* トップWorksスライダー設定 テスト01 */
const swiperWorks01 = new Swiper ('.js-top-works-slider01', {
  allowTouchMove: true,
  loop: true,
  autoplay: {
	  delay: 5000,
	  disableOnInteraction: false,
  },
  pagination: {
	  el: '.js-pagi01',
	  type: 'bullets',
	  clickable: true,
  },
  thumbs: {
    swiper: swiperWorks02,
  },
});テキストエリアはallowTouchMove: false, でマウスドラッグしないようにしています
あとはthumbs:で連動指定してあげればOKです
最後に
スライダーに関しての記事はよくみますが、スライダーアイテムを動的に表示かつ連動したスライダーって見たことが無いような気がしたので書いてみました
最初はどういうふうにやれば良いか分からなかったり難しかったりもすると思いますが、1つ1つやっていけばできると思います!